Create branded email layouts that elevate your communication #
With the built-in BeeFree editor, you can visually design reusable email layouts for your newsfeeds — helping you work faster, stay on brand and elevate the impact of your communication. These templates define how your media monitoring results (e.g. media reviews) appear when shared via email — ensuring clarity, consistency and a professional look for your audience.
Easily align each template with your corporate design by customising fonts, colours, logos and layout styles — so that every email you send reflects your organisation’s visual identity.
Step 1: Open the BeFree editor #
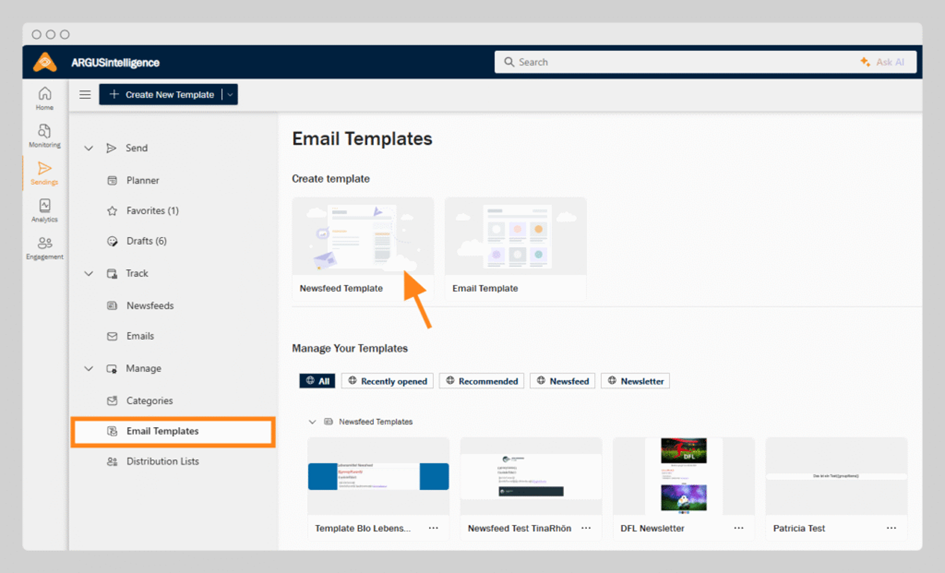
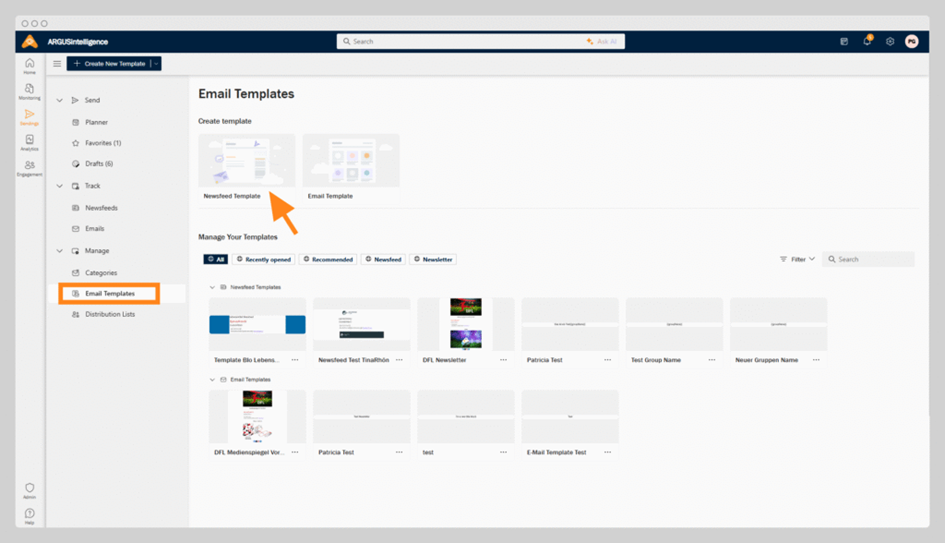
To get started, click “+ Create New” in the top action bar and select Newsfeed Template
(Screenshot: Create a Newsfeed Template from the Main Action Bar). This will open a new, blank layout and take you directly to the BeFree editor, where you can begin building your custom email design. You will later use this template when creating a newsfeed with email as the selected output type.

Alternatively, you can also navigate to Email Templates via the left-hand navigation: open the Manage area in the Sendings section and click Email Templates. This area contains all of your saved templates — and enables you to create a new template by selecting Newsfeed Template (screenshot: Starting a new template from the Email Templates overview).
Once you have opened a new template, the BeFree editor launches — a clean, intuitive drag-and-drop interface built directly into the ARGUSintelligence platform. You can design your email layout by visually arranging and customising content blocks. No coding required.
Step 2: Available templates #
We provide a selection of ready-made templates for all our customers to help streamline the setup of their newsfeed or content views. These templates are designed to cover common use cases and can be used immediately.
Purpose: templates offer a quick and efficient way to get started with a structured layout. They are fully customisable, allowing users to adapt them to their specific needs and preferences. All provided templates are included in the service – there are no additional costs for using or modifying them.
Step 3: Build your layout visually #
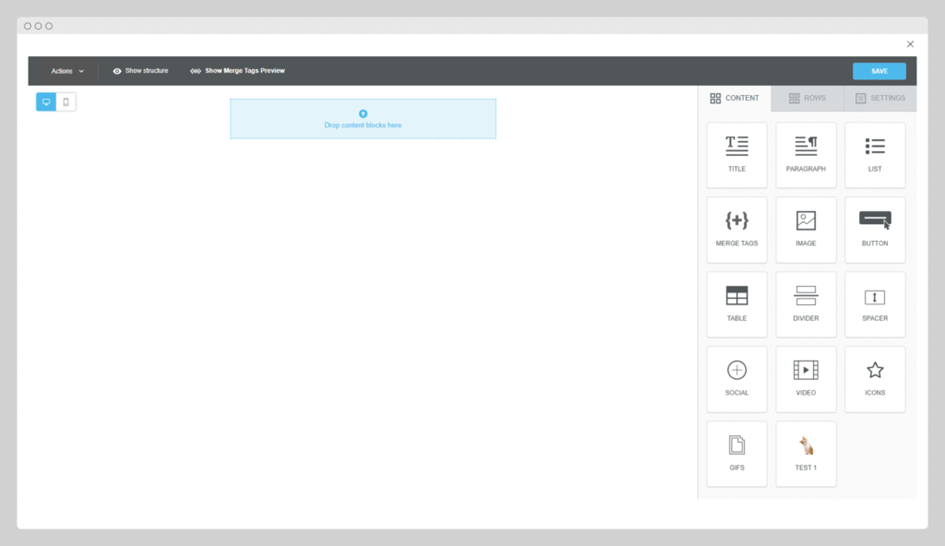
On the left side of the screen, you will find the editor canvas, where you drag and arrange your content
Above the canvas, toggle between desktop and mobile preview to see how your layout adapts to different screen sizes (screenshot: BeeFree editor).
On the right side, the interface is divided into three functional tabs: content, rows and settings.
1. Set up the structure of your layout
Start by deciding how your layout should be structured – for example, single-column or two-column. Before you start adding content, you will define the overall layout of your email — including where elements like your logo, header text, article list, buttons or social media links should appear.
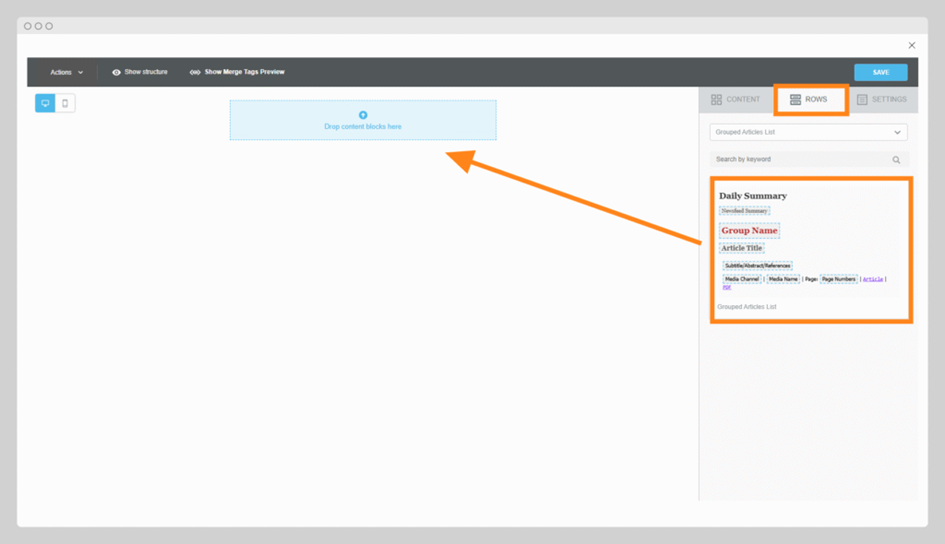
In the Rows tab on the right-hand side of the BeeFree editor, you will find structural building blocks for your layout.
You have two main options:
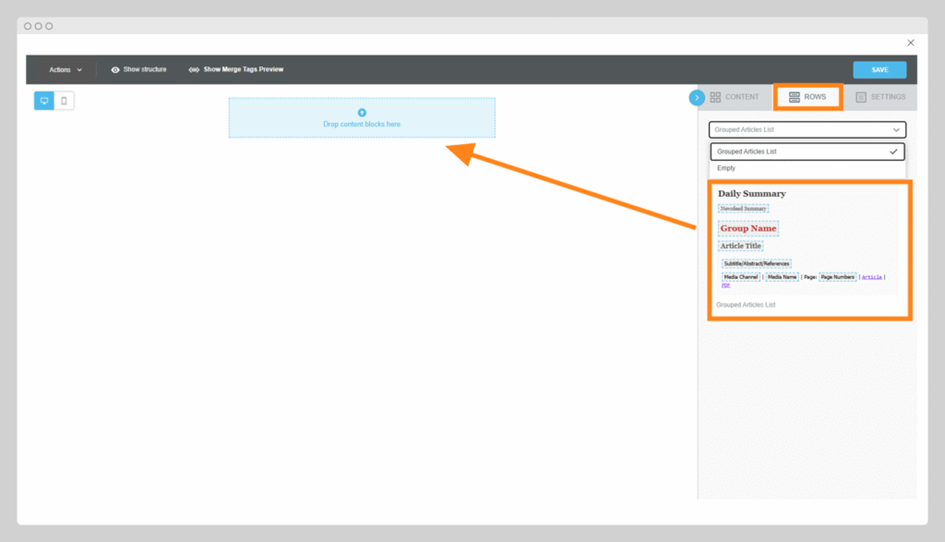
- Use the preconfigured article layout:
This ready-made block is designed specifically for displaying your media monitoring results (e.g. article title, source, date) in a repeatable format. You can drag and drop this directly into the editor to define where the dynamic article list should appear. (Screenshot: Preconfigured article row) - Start from an empty layout:
If you want to create a fully customised template that includes elements like:- your company logo in the header;
- a hero image or introductory paragraph;
- call-to-action buttons;
- social media icons;
- coloured background sections or dividers
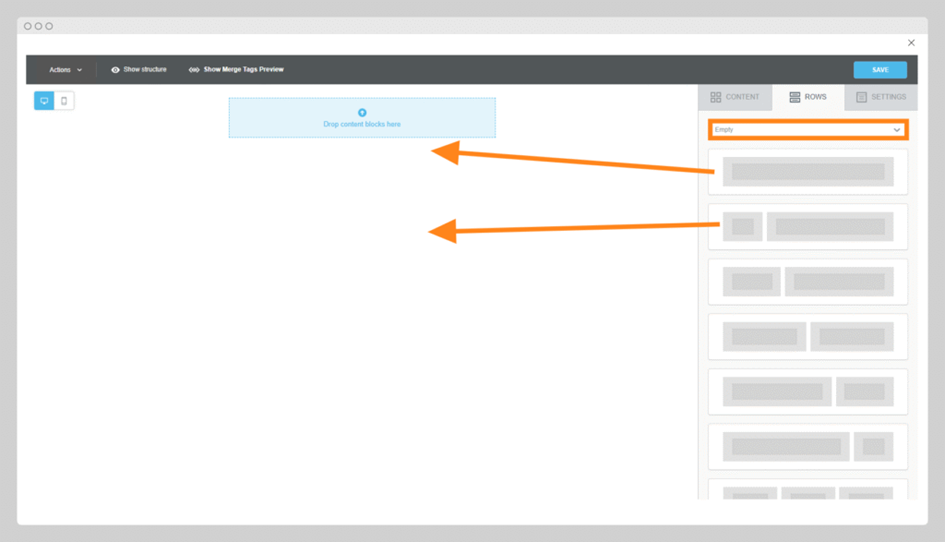
…then set the dropdown menu to Empty and build your layout from scratch using the available row formats. (Screenshot: Rows dropdown menu set to Empty)
To proceed:
- Choose the desired row layout (e.g. one full-width column, two columns, etc.).
- Drag and drop the row into the editor canvas to add it to your layout.
(Screenshot: Drag row into editor area)
You can repeat this process to stack multiple rows and define your structure exactly how you want it. Rows can be repositioned later by dragging them up or down.
Whether you start with a predefined article row or an empty layout, you can always adjust and combine rows to create a fully branded newsletter-style template. The article list is just one part of the final message.
Once your structure is in place, you will continue by adding content blocks like text, images, buttons and merge tags to bring your template to life.
2. Add content blocks to your layout
Once your structure is defined using rows, the next step is to fill each row with content. To do this, drag content blocks into the layout — similarly to how you might build a classic newsletter. Go to the Content tab (the first tab in the right-hand menu) to access all available block types.
Available content blocks include:
- Text – titles, paragraphs, lists
- Image – for logos, banners or illustrations
- Button – ideal for call-to-action elements
- Table – useful for organising media content or highlights
- Divider – add a horizontal line to separate sections
- Spacer – add a vertical space between blocks
- Social – add icons with links to your social media pages
- Video – embed video content or links
- Icons & GIFs – visual elements to support your message
How to add content:
- Simply drag the desired content block (e.g. Text, Image, Button) into one of your previously defined rows in the editor.
- Place it wherever it fits best in your layout, e.g. an image at the top for your logo, followed by a text block, then a divider.
- You can move blocks up or down anytime by dragging them to a new position within a row or between rows.
Tip: plan your layout with your branding and communication goals in mind — for example, start with a logo and greeting, then introduce the article list from your media monitoring and close with a footer including social links. (Screenshot: Dragging content blocks into the editor area)

The next step is to customise each content block — for example, uploading your logo, changing background colours or adjusting fonts — to align the template with your corporate design.
Ready? Then let’s move on to customising your design.
Want to add a short intro? → Drag a paragraph block below it.
3. Customise the content (e.g. uploading an image)
Once you have added a block (e.g. an image), click on it. The editing panel will appear on the right.
To upload an image: #
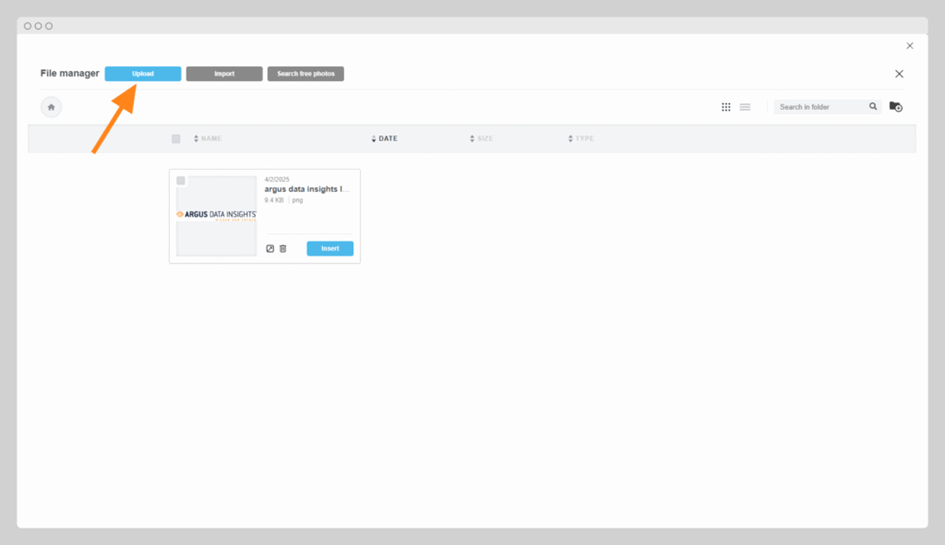
- Click Browse in the image block. (Screenshot: Browse button)
- This opens the ARGUS Webspace – your image storage.
- You now have various options:
- Upload: select an image from your device (Screenshot: Upload button)
- Import: import from Google Drive, Dropbox, OneDrive, etc.
- Search free photos: browse free stock images
- Simply choose an image you have uploaded previously
- Click Insert to add it to your layout.
- You will return to the editor with your image in place.
- In the settings panel, you can now:
- Align the image (left, centre, right)
- Add a clickable link
- Adjust the image size (e.g. full-width on mobile)
- Add alt text (for accessibility and fallback)

4. Insert dynamic content using merge tags
To personalise your template with live content from your ARGUS newsfeed (e.g. with article titles, publication names or the date), you will need to use merge tags. Merge tags are dynamic placeholders that are replaced with real content when your email is sent. For example:
- {{Newsfeed.Date}} → becomes the distribution date of the newsletter.
- {{Article.Title}} → becomes the title of an article in the newsfeed.
You can start either with an empty layout or by selecting a preconfigured template that already includes standard merge tags such as {{Article.Title}} and the required group name.
To insert a merge tag, simply drag the template element (e.g. from the Group: Article List tab) directly into your layout. There is no need to create a text block first — the necessary content block is inserted along with the tag. (Screenshot: Inserting merge tags via drag and drop)
Note: merge tags can only exist within text-based elements and will not work inside buttons, images or structural containers like rows or columns.
Important: every template that includes newsfeed articles must contain a Group Name merge tag.
This tag tells the system which block should repeat automatically for each article in the newsfeed. Without it, the template cannot be saved.
Merge tags can only be used inside text blocks — not in buttons, images or other layout elements. You do not need to insert a separate block beforehand: simply add the tag into any empty line within a text block.
- Click inside a text block
Place your cursor in an empty line where you want the dynamic content to appear (e.g. article title, recipient name). - Click the merge tags icon
Use the toolbar above the text block to click the merge tags symbol.
(Screenshot: Merge tags icon clicked) - Search and select your tag
The Merge Tags search window will open. You can filter or search by:- Type (e.g. Monitoring, Sendings)
- Property (e.g. Group, Source, Enrichment)
- Tag (e.g. Group Name, Article Title)
(Screenshot: Merge Tags search window)
- Insert the tag
Choose your tag (e.g. {{Article.Title}}) and click Add.
The tag will now appear in your text and be replaced with real content when the email is sent.
How merge tags are structured
Every merge tag has three parts:
| Element | Description | Example |
|---|---|---|
| Type | The data source (e.g. Monitoring) | Monitoring |
| Property | The data field (e.g. Group, Source) | Group |
| Tag | The actual placeholder used in the layout | {{Group.Name}} |
5. Assign a group name (required!)
To repeat content for each article in your newsfeed, your layout must include a group name. This tells the system: “Loop this block for each article.”
Here’s how:
- If you used the Grouped Article List, the group name is already set.
(Screenshot: Group name in suggested block) - If you are building your layout manually:
- Add a text block where the articles should loop.
- Open the Merge Tags window.
- Go to the group: Article List tab.
- Choose a tag like {{Article.Title}} and insert it.
→ This will automatically assign a group name to the block
(Screenshot: Group article list tab)
(Screenshot: Group name in block settings)
If no group name is defined, the following error will appear when you save your template:
“Group name is missing — please define before saving.”
Step 6: Save and reuse your template
Once your layout is complete and the required merge tags (including the group name) are in place, you are ready to save your template.
- In the top right corner of the editor, click Save.
- Give your template a clear name — especially if you plan to reuse it later.
- If the system detects a missing group name, it will block saving and show an error message:
“Group name is missing — please define before saving.” (Screenshot: Group name missing error)
After saving, you can find your templates as follows:
- Go to the Templates section of the ARGUS Editor.
- Your saved templates will appear in a list — click on a template to edit, preview or use it as a base for a new campaign. (Screenshot: Selecting a newsfeed template in the Email Templates section)
Pro Tip:
If you often use the same layout (e.g. daily summary, grouped articles, greeting + article list), save a template version called Starter or Base Layout — then duplicate it whenever you start a new campaign.


